Plants vs. Zombies 2: Frostbite Caves Part 2 Quick Walkthrough and Strategy Guide
Here’s the 2nd part of the quick walkthrough and strategy guide for the “Frostbite Caves” stages in the strategy defense game – Plants vs. Zombies 2: It’s About Time! Explore the frozen wastes of prehistory and chill out with the coolest zombies ever. Beware the winds of your plants will be frozen veggies. 
![]()
«Back to Plants vs. Zombies 2 Guides List
Tips to Remember!
– Play Frostbite Caves Part 1 Quick Walkthrough and Strategy Guide first before this guide!
Stunion – Stuns zombies 2 tiles in front, and can also affect zombies at the back of it.
Fire Peashooter
– Immune to frost and warms nearby plants, not free but playable on some stages.
Rotobaga
– Shoots projectiles along the four diagonals, in each direction that has a target. Not so great if placed on the first few columns, so you need to place them on the 3rd column onwards, or outside your walls (behind ice blocks for example).
______________________________
– Blue Labeled Plants: Frozen given plants by default. Melt and use them as your bonus plants, replace if fallen (optional or no need to add or replace). – Snapdragons: After placing 2 Sunflowers, place the first 2 Snapdragons on the 2nd and 4th row first, next on 3rd, then 1st and 5th rows last. If the formation below requires 2 columns of Snapdragons, start by placing 4 of them on the the 2nd and 4th row, and so on. – Note: Use Wall-Nuts or Tall-Nuts if needed to defend your Snapdragons. – You can instantly repair defensive plants like Wall-Nuts and Talls-Nuts by planting the same plant on top of them. – You can use Plant Food on any seed packet to instantly refresh their cool down. – You can manually launch one mower by tapping and holding! – After you complete the formation below, you may slowly replace your Sun producing plants with offensive plants. – If you are having difficulty, you may use Power Ups or buy PFs if you like.
How to Plant Guide:
– | Sunflower | Peashooter | Peashooter | Wall | – This means: Plant Sunflowers in the 1st column from the left, Peashooters in the 2nd and 3rd columns, then Wall-Nuts in the 4th column.
______________________________
– World: Frostbite Caves Day 17 to 30 –
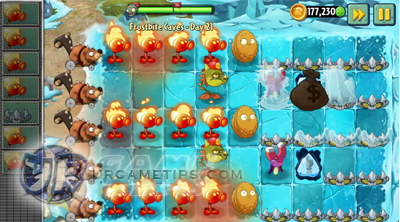
– | Sunflower | Snapdragon | Snapdragon | Fumes and Wall | Chards | – PF: Any – Hot Potato: Use it on Fumes then sell them early on, set up your Snapdragons next. Use it on frozen zombies too to avoid Troglobite’s push attacks. – Cherry Bomb: vs Troglobite (do not let his frozen zombies get near your plants.) – Blover: vs Dodo Rider Zombies (wait for it to fly first before using). – Just quickly put all attacking plants on the first 3 columns from the left. – PF: Any vs heavily grouped zombies near your plants. – Stunion: vs zombies near your plants. – | Sunflower and Cabbage | Pepper-pult (2 only) | None | Snapdragon | Snapdragon | Wall | – PF: Snapdragons vs heavily grouped zombies. – Hot Potato: Quickly unfreeze your Sunflowers then setup Snapdragons. – Pepper-pult: Only place 2 Pepper-pults on the 2nd column: 2nd and 4th rows to keep your plants warm. Do this after the Wall-nuts are usable with decent Snapdragons. – Blover: vs Dodo Rider Zombies (wait for it to fly first before using). – Stunion and Cherry Bomb: If needed. – | Sunflower | Pepper-pult | Snapdragon | Wall | – PF: Any – Hot Potato: Unfreeze plants and zombies. – Cherry Bomb and Stunion: vs Troglobite (do not let his frozen zombies get near your plants.) – Refer below screenshot for formation:
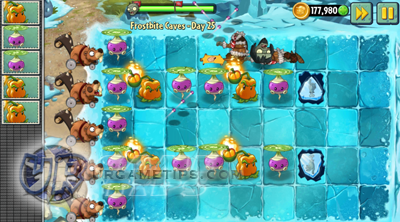
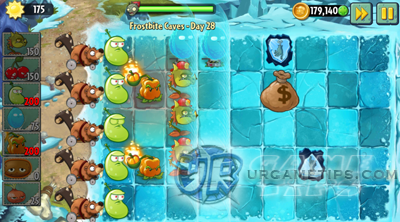
 – PF: Any – After the formation above, place the remaining plants wherever you like. – | Sunflower | Pepper-pult | Snapdragon | Wall | – PF: Any – Hot Potato: Unfreeze those 3 Guacodiles and sell them, be careful, do not to unfreeze them while zombies are nearby. – Cherry Bomb and Stunion: vs heavily grouped zombies. – | Sunflowers | Chard Guard | Snapdragon | Wall and Twin | Twin | Twin | – PF: Any or use on Chard Guards to let them recover. – Hot Potato: Unfreeze those 3 Twinflowers and sell them early on. – Chard Guard: Plant another one on top of them to restore their health. – Cherry Bomb: If needed. – After the formation above, replace Sunflowers with Lightning Reeds! – | Twin Sunflower and Pepper-pult | Snapdragon | Wall | – PF: Twin Sunflower to get more Sun. – Twin Sunflower (3 only): Plant on 1st column: 1st, 3rd and 5th rows. – Hot Potato: Quickly unfreeze frozen plants. – Pepper-pult (2 only): Plat on 1st column: 2nd and 4th rows to warm plants. Do this after placing at least 2 or 3 Snapdragons to secure the front lines. – Cherry Bomb and/or Blover: vs Dodo Rider, or heavily grouped zombies. – Optional: You can also add in the Sun Bean plant if you can’t reach the required Sun, just keep feeding the zombies with Sun Beans before defeating them. – Refer below screenshot for formation:
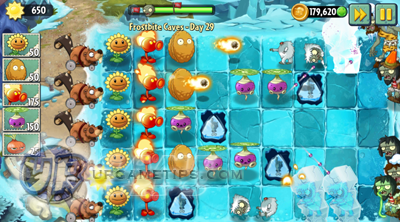
 – PF: Rotobaga vs group of tough zombies. – Stunion: vs Dodo Rider Zombies, Troglobite, or any tough zombies. – Keep remaining plants to quickly replace fallen plants, or place the remaining plants wherever you like. – | Sun-shroom and Sunflower | Pepper-pult | Snapdragon | Wall | – PF: Any – Hot Potato: Unfreeze those 2 Sun-shrooms early on to get more sun. – Pepper-pult: Always plant them after placing enough Snapdragons first. – Cherry Bomb: vs Dodo Rider Zombies, Troglobite, or any tough zombies. – Rotobaga: This is optional, place them on the 5th or 6th column, behind those ice blocks. – | Laser Bean | Snapdragon | Sunflower | Wall | Wall | – PF: Save and use it on your Laser Bean, vs Sloth Gargantuar. One other way is to use it on your Cherry Bomb seed packet to remove cooldown, giving you a chance to use 2 Cherry Bombs on the Gargantuars. – Concentrate your walls on the 4th column: 3 center rows first. Replenish if necessary. Place some Snapdragons first before deploying Laser Beans. – Hot Potato: To help unfreeze zombies, do not let the Troglobite use it’s push attacks. – Cherry Bomb and Stunion: vs Sloth Gargantuar, Dodo Rider Zombies and Troglobite zombies. – Mower: vs 1 Sloth Gargantuar. Manually launch one mower by tapping and holding on it. Do this especially if there are 2 Sloth Gargantuars, to quickly eliminate the other one. – Refer below screenshot for formation:
 – PF: Use 2 on your Infi-Nuts early on, but only restore the shield of the first Infi-nut once it is totally breached, your 2nd Infi-nut will take care of the rest. Use remaining PFs on Laser Bean vs Sloth Gargantuars. – Hot Potato: To help unfreeze plants. – Mower: vs 1 Sloth Gargantuar. Manually launch one mower by tapping and holding on it. Do this especially if there are 2 Sloth Gargantuars, to quickly eliminate the other one. – Cherry Bomb and Stunion: You have 500 Sun left, use them to stop those Sloth Gargantuars. – Refer below screenshot for formation:
 – PF: Any – After the formation above, replace all Sunflowers with Fire Peashooters. – | Fire Peashooter | Any | Rotobaga or Any | Rotobaga or Any | Chard Guard or Any | – PF: None – Hot Potato: Use to unfreeze Ice Blocks in front of Dr. Zomboss. You will be given a chance to stun him once all ice blocks are cleared! – Fire Peashooter: Fill up the left most column, then slowly replace the next column with this plant if you can. – Rotobaga: Note that Rotobaga performs better when placed on the 3rd column onwards. – Chard Guard: Place them only on the 5th column onwards, so that they won’t disrupt your placements. – Just deploy your plants quick and on place, this one should be easy.
______________________________
Plants vs. Zombies 2: Lost City Part 1
– Go here: Lost City Quick Walkthrough and Strategy Guide
______________________________
Related Plants vs. Zombies 2: It’s About Time Tips & Guides:
– Plants vs. Zombies 2: It’s About Time: Plant Food Effects on Plants
– Plants vs. Zombies 2: Dark Ages Quick Walkthrough and Strategy Guide
– Plants vs. Zombies 2: Big Wave Beach Quick Walkthrough and Strategy Guide
– Plants vs. Zombies 2: Lost City Quick Walkthrough and Strategy Guide or ![]() «Back to Plants vs. Zombies 2 Guides List
«Back to Plants vs. Zombies 2 Guides List